Using the Free Tier on Amazon Web Services (EC2)
Many times during penetration testing, playing CTFs, conducting phishing campaigns, hosting Metasploit sessions, creating VPN sessions, creating IRC bots, I find myself needing a Linux Installation of my choice and having a Public DNS (Domain Name System). It seems that every Security Researcher or Security Professional deals with this same problem. And here VPS (Virtual Private Server) plays an important role. Choosing a VPS is really a difficult task for me and also for everyone.
Firstly, I will discuss what a VPS is? VPS stands for Virtual Private Server and it is a virtualized server that lots of users use as a dedicated or private server though it is installed in a physical computer with multiple operating systems running simultaneously. A virtual private server can be controlled remotely using any Internet-connected device. VPS is generally used for hosting a website. But the service it provides, gives a lots of power to do many tasks for security professional.
So, Now you have understood what a virtual private server is. Let's discuss how to use a virtual private server in real world and also how to launch a virtual instance free.

Amazon Web Services provides free tier for 12 months. To read more about Amazon's offer, you can browse here. Amazon's EC2 instance is appropriate for me and also it is FREEE!!!. So what is EC2? Amazon EC2 refers to Amazon Elastic Computer Cloud. Amazon EC2 is a commercial Web service from Amazon's Web Services (AWS) that let's customers "rent" computing resources from the EC2 cloud. EC2 provides storage, processing, and Web services to customers.
Let's see how to launch an instance and how to connect to it. Follow the steps from here carefully!

You'll see a page like the following. Fill out the requested information.

After Continuing, now you have to fill some of your contact information. Note - Carefully fill details and account type. (I am filling it as Personal Use).

After filling the Contact Information. Now you have to give some Payment Information. But I said it is free. Ya! I remember that but they charge Rs. 2 for Verification Process, which will then refunded after 3-5 days. Fill out the payment information (Credit/Debit Card Details) and click on "Verify and Add"

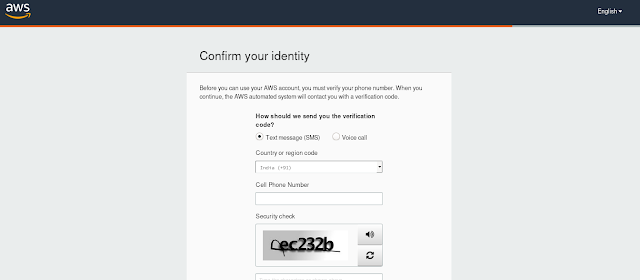
After successful transaction, it will Confirm you Identity with some One-Time Password Verification with Phone Number you have gave at Contact Information Step. Confirm your identity also with some Captcha Verification.
After verifying using 4-digit pin, It will ask you about plans. As I said for free So, we will choose basic plan. Click on "Free".

After redirecting to the registration confirmation page, fill out some details of the "Personalize Your Experience"

Now Click on the Top Right Corner Button - "Sign in to the Console" and it will redirect you to the AWS Sign-in page. Sign-In with your Credentials that you registered earlier.

After successful sign-in, you will be redirected to the "AWS Management Console" Page.

In the Navigation Bar, there is a Services Drop-Down list. Click on Services and then Click on EC2.

You will be redirected to your EC2 Dashboard. Scroll-Down and Click on "Launch Instance".

Now, You have to choose Amazon Machine Image (AMI)
 Click on AWS Marketplace on left bar and search for Kali Linux. As I am going to Use Kali Linux Instance, You can choose of your choice. Then, Click on Select.

After some Scrolling Click on Continue. Don't afraid, as it shows some pricing.
 Now comes a main task of Choosing Free Tier. Carefully Check the box which is showing Free tier in Green Color (t2.micro) and then click on "Review and Launch".

Now you are at Step 7 of AWS Launch Instance (Review), Click on "Configure Security Group" Step 6 from the Bar. Here you have to configure the SSH information.

From the SSH information Table in the Source Column, Select the Anywhere from the drop-down list. Then, Click on "Review and Launch".

Now you are done with configuration, Click on Launch.

Now, you have to configure Key pairs for SSH Connections. A menu of "Select an existing key pair or create a new key pair" comes up!
 As you are the new for VPS, Select the first drop-down list to "Create a new key pair". Fill the key name and download the .pem
file (This file is very important for the SSH connection).

Click on Launch Instances after successfully downloading the .pem file. You will be redirected to the Launch Status page. Now click on Instance ID. (Next to initiated: i-something!)

Open your Terminal in your local machine. Navigate to directory containing that .pem file.
There also a command for connecting to the SSH. Copy that command and paste to the terminal and press Enter. Note - You should have to be in that directory containing .pem file.

It will ask you for the connection and type yes for signing. But after Yes it will not connect because you are using the command with user root. That is, completely correct as you are not the root user. Error - "Please login as the user "ec2-user" rather than the user "root"."
Change the Above SSH command with the user "ec2-user" and run that again. And now you are in your AWS instance remotely. Volaaaaaaaaaaaaaaaaaaaaaaaaaaaaaaaaaaaaah.

As I promised you will get an AWS Instance free. Now, you have.
Some Advises, that stop the Instance when you are not using it as it has another criteria of Number of hours - 750 hours/month.
You can stop it from here: -

Also another my personal advice, what we will do after 12 months. HAHAHA.. Another thing is that you can create a new AWS account using same Phone Number and Credit/Debit Card details. As they have no validation over there till now. But you should have to use different Email Address and a genuine email address.
Let's run Metasploit !!!

Msfconsole running on AWS Instance with public DNS. Now you can do many more stuff as I discussed in the Starting.
Firstly, I will discuss what a VPS is? VPS stands for Virtual Private Server and it is a virtualized server that lots of users use as a dedicated or private server though it is installed in a physical computer with multiple operating systems running simultaneously. A virtual private server can be controlled remotely using any Internet-connected device. VPS is generally used for hosting a website. But the service it provides, gives a lots of power to do many tasks for security professional.
So, Now you have understood what a virtual private server is. Let's discuss how to use a virtual private server in real world and also how to launch a virtual instance free.

Amazon Web Services provides free tier for 12 months. To read more about Amazon's offer, you can browse here. Amazon's EC2 instance is appropriate for me and also it is FREEE!!!. So what is EC2? Amazon EC2 refers to Amazon Elastic Computer Cloud. Amazon EC2 is a commercial Web service from Amazon's Web Services (AWS) that let's customers "rent" computing resources from the EC2 cloud. EC2 provides storage, processing, and Web services to customers.
Let's see how to launch an instance and how to connect to it. Follow the steps from here carefully!
Sign Up! for Amazon Web Services 🥰
Firstly, You have to browse to AWS Console. On the Top Right Corner Click on "Create an AWS Account".

You'll see a page like the following. Fill out the requested information.

After Continuing, now you have to fill some of your contact information. Note - Carefully fill details and account type. (I am filling it as Personal Use).

After filling the Contact Information. Now you have to give some Payment Information. But I said it is free. Ya! I remember that but they charge Rs. 2 for Verification Process, which will then refunded after 3-5 days. Fill out the payment information (Credit/Debit Card Details) and click on "Verify and Add"

After successful transaction, it will Confirm you Identity with some One-Time Password Verification with Phone Number you have gave at Contact Information Step. Confirm your identity also with some Captcha Verification.

After verifying using 4-digit pin, It will ask you about plans. As I said for free So, we will choose basic plan. Click on "Free".

After redirecting to the registration confirmation page, fill out some details of the "Personalize Your Experience"

Now Click on the Top Right Corner Button - "Sign in to the Console" and it will redirect you to the AWS Sign-in page. Sign-In with your Credentials that you registered earlier.

Launching An Instance 😏
After successful sign-in, you will be redirected to the "AWS Management Console" Page.

In the Navigation Bar, there is a Services Drop-Down list. Click on Services and then Click on EC2.

You will be redirected to your EC2 Dashboard. Scroll-Down and Click on "Launch Instance".

Now, You have to choose Amazon Machine Image (AMI)


After some Scrolling Click on Continue. Don't afraid, as it shows some pricing.


Now you are at Step 7 of AWS Launch Instance (Review), Click on "Configure Security Group" Step 6 from the Bar. Here you have to configure the SSH information.

From the SSH information Table in the Source Column, Select the Anywhere from the drop-down list. Then, Click on "Review and Launch".

Now you are done with configuration, Click on Launch.

Now, you have to configure Key pairs for SSH Connections. A menu of "Select an existing key pair or create a new key pair" comes up!

file (This file is very important for the SSH connection).

Click on Launch Instances after successfully downloading the .pem file. You will be redirected to the Launch Status page. Now click on Instance ID. (Next to initiated: i-something!)

Connecting to AWS EC2 Instance Remotely 😅
Now, You can see the status of Instance and many-more things. There is Connect button on the top, click on that. There are some steps you need to follow: It shows you about the Public DNS.
Open your Terminal in your local machine. Navigate to directory containing that .pem file.
Firstly, you have to change the permission of the .pem file. Use the command in Linux "chmod".
chmod 400 kalilinux.pem
There also a command for connecting to the SSH. Copy that command and paste to the terminal and press Enter. Note - You should have to be in that directory containing .pem file.

It will ask you for the connection and type yes for signing. But after Yes it will not connect because you are using the command with user root. That is, completely correct as you are not the root user. Error - "Please login as the user "ec2-user" rather than the user "root"."
Change the Above SSH command with the user "ec2-user" and run that again. And now you are in your AWS instance remotely. Volaaaaaaaaaaaaaaaaaaaaaaaaaaaaaaaaaaaaah.

As I promised you will get an AWS Instance free. Now, you have.
Some Advises, that stop the Instance when you are not using it as it has another criteria of Number of hours - 750 hours/month.
You can stop it from here: -

Also another my personal advice, what we will do after 12 months. HAHAHA.. Another thing is that you can create a new AWS account using same Phone Number and Credit/Debit Card details. As they have no validation over there till now. But you should have to use different Email Address and a genuine email address.
Let's run Metasploit !!!

Msfconsole running on AWS Instance with public DNS. Now you can do many more stuff as I discussed in the Starting.


Post a Comment